Read about how to prepare and bake whole wheat sourdough bread with a bottom-drive stand mixer and cast iron pans.
When I started baking sourdough in May 2023, my kitchen did not have a regular stand mixer. I have an electric kitchen oven and have since bought a Dutch oven, a large Cambro tub, spatulas, dough scrapers, etc., to get going. And I used my right shoulder, arm, hand, and dough whisk to mix ingredients, and my family did not pity me.
However, recently NutriMill put its Artiste mixer on sale, and I could not resist adding it to my baking tools. By now, my right shoulder’s bones, muscles, and ligaments have told me they are grateful for that purchase.
I also learned that making good bread by hand mixing is possible. However, high-hydration doughs are notoriously difficult to work with. I found that longer and faster mixing was helpful to develop a better gluten matrix in my 78% hydrated dough. So, a capable stand mixer is what I now strongly recommend.
The Artiste has a 6.5 qt capacity and handles up to 6 lbs or 2.7 kg of dough. That is enough for a baker with two Dutch ovens to bake two or three loaves for family and friends. That is what I currently do. If I were to scale up my effort to a retail or even wholesale level, I perhaps would need to look at a more capacitated mixer like an Ankarsrum Assistant (with a 7 l bowl, it can mix 5 kg of dough) or a Famag IM-5 or IM-8 spiral mixer, and an oven like the Nero 400.
I use the mixer to incorporate and thoroughly mix the typical 2,700 g of flour, water, salt, and levain per bake for three large 50% whole wheat sourdough loaves. Now, a stand mixer might be overkill for a home baker mixing only about 1,000 g of flour, water, salt, and levain for one loaf at a time. That much, or little, mass of dough can be mixed and developed by hand in a simple bowl without much trouble.
But I bake two or three large loaves, and this decent stand mixer works for me. I usually mix my high-hydration dough for 12 to 14 minutes at speed #3 until after the dough clears the side of the mixing bowl. The Artiste does not wobble or walk on the countertop and has not overheated on me. The dough comes out reasonably coherent and supple, although not as good as if done in a spiral mixer. But for the little money, the Artiste is an excellent mixer for someone starting to bake sourdough bread at home.

Sourdough bread is a timeless art form that might have originated way back in ancient Egyptian times. It’s pretty cool that this whole process was probably discovered by accident! The fermentation that happens when making sourdough bread is good for us, as it helps our bodies digest gluten, thanks to all those awesome probiotics. It’s even said that folks who usually can’t handle gluten might be able to enjoy appropriately fermented sourdough bread. The acids created during fermentation help the bread last longer without preservatives. How neat is that?
I write recipes using metric measurements, so you might want to buy a kitchen scale from a store if you don’t have one already. Although there are sourdough recipes with Imperial measurements, messing up the measurements with sourdough is pretty easy. This is because the dough’s volume changes a lot during the process, so 1 cup could weigh a lot different hour by hour. You can also use my free conversion calculator.
Gather the Ingredients for Sourdough Bread
Flour
Contrary to some marketing hype, baking sourdough bread is not super simple – although all you need is flour, water, salt, and a sourdough starter. Each of these ingredients has its little quirks. For instance, the flour must be strong flour or whole wheat flour, or a mix of both, with at least 11-13% protein.
Regular all-purpose flour from the store doesn’t cut it for me regarding nutritional and protein content. A higher protein content helps to create a voluminous rise and an open crumb in my sourdough. And whole wheat has the nutrition and flavor as well.
I still get my flour in 5 lbs bags from the store. 25 lbs bags can easily be purchased online.
Water
I use non-chlorinated water for this recipe. The desired dough temperature is the temperature that wild yeast and lactobacilli favor for their fermentation activities, around 78°F. The water’s temperature is the best means to coax the dough to that temperature.
You can use my free temperature calculator to determine the water’s optimal temperature, whether lukewarm for cooler days or iced for hotter days.
Alternately, multiply the desired dough temperature of 78°F by four, and then subtract the temperatures of the flour, the room, and the starter. If all three are at 72°F, the ideal water temperature will be 96°F if you mix by hand.
Salt
I use fine sea salt as it dissolves and blends more easily into the wet dough. And I do not skip on the salt because the dough’s internal chemistry needs some.
Baker’s Yeast? Nope…
Baker’s yeast is unnecessary since we are bent on using levain instead. What is Baker’s yeast? It is a commercially developed yeast, much more potent than the wild yeast occurring naturally in the air. Savvy bakers typically prefer using Baker’s yeast as it saves a baker the time to prepare a sourdough starter and subsequent levain.
There is nothing wrong with using Baker’s yeast for quick breads. It is just that the long sourdough fermentation, thus avoided by savvy bakers, is what otherwise generates the tangy flavor that sourdough bread is appreciated for. We do not need to add sugary honey to sourdough. Bread made with Baker’s yeast instead of sourdough starter/levain is not rightfully called sourdough.
Levain? Yes, please…
What is levain? Everyone is familiar with flour, water, salt, and Baker’s yeast. But levain? Levain is a preferment and, as such, an offspring of sourdough starter. This levain is added to the main dough, instead of Baker’s yeast, after autolyse.
Again, a long fermentation of the dough is what produces the exceptional flavors of sourdough bread. During fermentation, the beneficial microbes of wild yeast and lactobacillus start breaking down the complex carbohydrates and starches in the flour. This age-old process makes for an easier-to-digest meal for humans.
To simplify, wild yeast cultures produce an amazing rise in the bread, and lactobacillus cultures produce the delicate flavors of sourdough.
When bakers develop a sourdough starter, they continuously mix and add and mix flour and water and wait patiently for the naturally occurring microbes to colonize the paste (prefermenting sourdough starter) and get ready to work in the final dough. It takes a bit of time, if not an entire week, to ‘grow’ these healthy cultures in the starter. With its mature culture, this starter is then kept and maintained (fed) by the baker in perpetuity.
A small portion of this mature starter is then separated by the baker to be built out as levain. To this small portion of starter, the baker adds flour and water until the recipe’s requirement is matched and waits for the cultures in the levain to multiply and ferment its paste. At the height of fermentation, this now aromatic and flavored levain is permanently expended into the main dough for the active microbes to continue their magic therein during bulk fermentation.
However, all microbes will give up their lives and die at the extremely high baking temperatures of around 475°F.
Equipment for Sourdough Bread

At the beginning of my explorations into baking homemade sourdough bread, I used a large, round, 12 qt. Cambro bucket and a Danish dough whisk for incorporating and mixing all ingredients and letting the dough ferment for hours.
You may want to get a few baker’s tools.
That worked well enough for me for several months until my shoulder complained about strenuously mixing the dough for 10 minutes by hand. My family did not pity me, saying I should appreciate the exercise. And my spouse also began to complain that the round boules were tricky to slice at their ends, harder than elongated batards. Luckily, I found solutions to these two complaints.
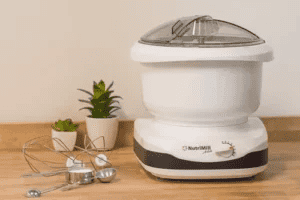
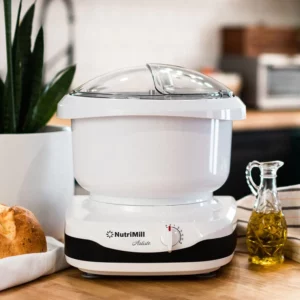
NutriMill’s Artiste Stand Mixer
I got the NutriMill Artiste stand mixer on sale. The machine made a difference. Affordable, this compact yet powerful bottom drive mixer easily mixes up to 6 pounds or 2.7 kg of dough or as little as one loaf. The mixer does not ‘walk’ on my countertop and does not take up too much space, either. I have never owned or worked on a KitchenAid stand mixer. All other typical stand mixers sold at Target or Walmart looked like they were meant to please pastry chefs and seemed too frail for bread dough.
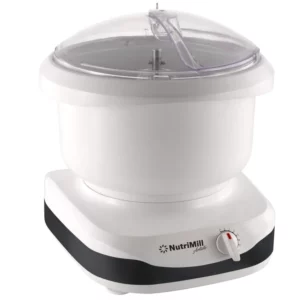
Not NutriMill’s Artiste stand mixer. After all, I found the Artiste nearly perfect for mixing the dough for baking two loaves with a final net weight of around 850g each. I do not bake sugary pastries as my family and I try to keep our bodies’ appearances as attractive as possible. And I have not yet baked volumes of loaves for retail sales.
Cleaning up a mixer built with a column protruding up in the middle and its removable parts is obviously not as simple as cleaning up a plain, concave bowl. I use bottle brushes to clean out the little nooks and crannies of my Artiste dough mixer and hook. No problems here.
NutriMill’s customer service is very responsive. I had dropped the mixer’s plastic bowl once and broke it. No problem; an inexpensive replacement bowl arrived just a few days later.
Cuisiland’s Cast Iron Bread & Loaf Pans

Again, when I started on the sourdough journey, I used two round 4 qt. cast iron pots for baking in the kitchen oven: these pots fitted round boules, not batards. I was good with that until my better half complained that the ends of round boules are trickier to slice than elongated batards.
So, I sprung the money for two elongated Cuisiland Cast Iron Bread & Loaf Pans. The pans’ shallow base makes it easier to load my dough, and the loaves brown better when uncovered. It made a difference to my spouse and daughter
Temperature Control is Important

One issue I had at the beginning of baking was assessing and maintaining the actual temperature of my current kitchen oven. It is an old oven, not a digitally controlled, AI-enabled, and almost sentient assistant. The temperature knob on the panel slides off and is adjustable. The wire inside the oven might eventually measure 500°F, but have my cast iron pots reached that temperature? They need to be that hot.
I bought a cheap infrared thermometer to calibrate my oven and ensure that even my pots’ lids are piping hot before covering my dough.
Refresh your Starter
Now, onto the sourdough starter. You can purchase a freeze-dried starter and rehydrate it at home or grow it using just flour and water (plus plenty of time). The simplest option is to get a bit from a local bakery or a friend who is already baking sourdough bread.
I made my sourdough starter following a recipe/procedure from Ken Forkish’s popular book Flour, Water, Salt, Yeast. It was not difficult at all, although I had to be patient.
Some folks have asked me if they can use an unfed sourdough starter to bake sourdough. The quick answer is yes, but I’ll get better results with a freshly fed starter. If your starter’s been chilling in the fridge, take it out the morning before you plan to make bread and give it a refresh. If you’re already good about feeding your starter daily, you can skip this step since it should already be ripe and active. Ideally, you’ll want to ensure your starter is fed for three days before the day you plan to bake.
It’s straightforward to refresh a starter. I usually keep a small amount in a jar, which I store in a small insulated cooler in Summer or keep on the kitchen table in Winter. It never gets very cold here in Sacramento, California. I then add equal amounts of flour and water to the jar. I stir the gooey mess well and let it sit covered at room temperature during the cooler Winter season and for 1 to 2 hours at room temperature before it goes back into the cooler during the hot Summer season.
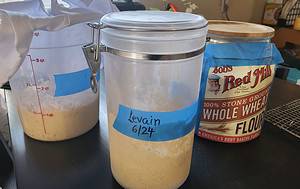
Build the Levain
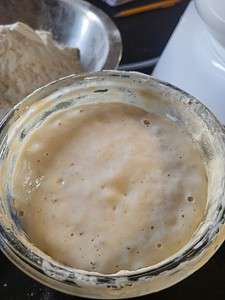
Two days before I bake bread, I retrieve my starter to make some levain. I may begin with 20 grams of mature sourdough starter and mix in 50 grams each of flour and room temperature water in the morning and again in the evening. Then, again, on the morning of prep day, I feed the microbes a little and leave the jar on the counter until I add it to the main dough.
I try to time the process so that the levain has already peaked for an hour or so by the time autolyse is finished. My levain is, therefore, ‘hungry’ again, meaning that the microbes in the levain are ready for the fresh ‘food’ of the main dough.
Start the Autolyse
Once the levain has had plenty of time to ferment and is ripe, it’s time to do the autolyse. This step is important because it combines just the whole wheat flour and water and allows the mix to rest so the flour can soak up all the water and the bran can soften. This is when gluten starts to develop.
For how long do I let the wheat and water rest in autolyse? It depends on the kind and volume of flour. I know of bakers who autolyse for as long as overnight and others who are satisfied with half an hour. I guess any time − short or longer − is beneficial.
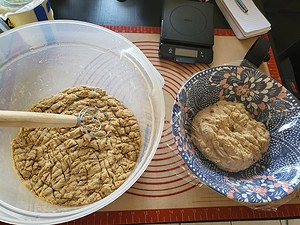
Nowadays, I often autolyse right in the Artiste stand mixer’s bowl for two hours. It is said that a long autolyse will somewhat reduce the time needed for mixing the dough.
Begin Bulk Fermentation
After the autolyse, I add the levain into the batch and thoroughly mix all in my Artiste stand mixer. Now, the levain’s cultures (wild yeast and lactobacilli) start doing their thing, which is fermenting the dough. I try to keep the dough at an optimal temperature of around 75°F to 82°F.
In Summer, my air conditioner keeps ambient temperatures at 82°F; anything much warmer than that could spell doom to my fermenting dough. In Winter, my central heater keeps even the kitchen warm at 72°F and I may use an electric heat mat under the fermentation container to raise temps just a few degrees.
Mind you, not all stand mixers are capable of handling bread dough. I bought the Artiste because it is a bottom-drive stand mixer and likely a strong enough tool to mix my typical 2kg batches of high-hydration whole wheat bread doughs. For 3 kg batches of dough, the mixer has the ability to develop good elasticity/extensibility in high-hydration doughs.
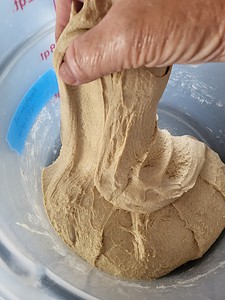
I use the mixer’s pulse function 3 to 4 times for a few seconds to start incorporating the ingredients: the levain, the autolysed main dough, and the salt. I then mix for 2 to 4 minutes at low-speed #2 to complete the incorporation of ingredients. I then give the dough a few minutes of rest and continue to develop the dough further by mixing it for 4 to 5 minutes on medium speed #3 and 2 minutes or so on #4. High-hydration dough (over 75%) can benefit from speedier mixing at #4. The desired outcome is that the dough comes clean off the sidewall of the bowl and is cohesive and elastic.

These mixing times need to be taken with a grain of salt. A dough that has been autolysed for a long time might not need that extensive mixing for development as the dough will have already developed a gluten structure during autolyse. On the other hand, high-hydration dough − being wet, may need plenty of speedy mixing till the dough develops some cohesion, elasticity, and extensibility.
I try to avoid overmixing, that is, tearing any burgeoning gluten strands already developed in autolyse. However, overmixing or tearing gluten strands is hard to do with high-hydration dough in its beginning stages.
Some bakers, therefore, prefer to incorporate and mix the dough by hand because they have, over time, come to have a feel for what they seek in the performance of the dough. I think 3 minutes of hand mixing to incorporate ingredients and an additional 10 minutes to develop the dough can work well for small batches, let’s say for one or up to two or three loaves. The Rubaud method is good to apply here. Larger volumes of dough may become too taxing for some bakers to mix properly by hand, especially if done frequently.
In any case, a windowpane test producing only slightly jagged tears might also reveal that the dough is starting to become cohesive and elastic and is ready for bulk fermentation.
Since using the Artiste to mix the dough, my loaves have never been as flat as they sometimes were with manual mixing. I can only guess I undermixed the dough by hand, even when working it for 10 minutes with the Danish dough whisk.
It is helpful to know that fermentation continues through dividing and shaping the dough and only begins to slow down a few hours after the bannetons with the dough are placed in the cold refrigerator. My thinking in all this timing is that I do not wish for the microbes to run out of food and drop dead way before the dough is retrieved from the fridge and placed into the Dutch ovens for baking.
Do the Stretch and Fold Maneuvers
Achieving a chewy texture and open crumb in great sourdough bread requires strengthening the dough through stretching and folding. This technique is picking up a section of the dough with two hands, stretching it out to the max without tearing it, and then folding it back onto the main portion of the dough. I repeat this process three more times, one in each quadrant of the dough. Four of these single stretch and fold maneuvers make for a set. I repeat the set about three more times within the first two hours of bulk fermentation, roughly 30 minutes apart.
End Bulk Fermentation
For how long do I let the dough bulk ferment? Well, that is a good question. Countertop fermentation begins as soon as the levain meets the autolysed main dough during mixing. Countertop fermentation can easily take anywhere from 3 to 7 hours. Again, I know no hard rule for the home baker. It takes a bit of experience to figure out the right time to continue with the next step: dividing and pre-shaping the dough.
I look for a domed dough top in the fermentation vessel, for large bubbles to emerge, especially on top, for the dough to have risen by some 30% to 50% in volume, and for the dough to wiggle like jello when the vessel is shaken. Only when most of these factors come together do I release the dough onto the countertop for division and pre-shaping.
Pre-shape and Bench Rest the Dough

Then, I use a bench scraper to turn the dough onto a lightly floured surface. Then, I divide the dough into two equal parts and give each batch a gentle shaping by lightly pulling sections from the circumference into the middle, as in the stretch and fold maneuver, turning it over, and tugging the edges towards the center. Next, I cover the pieces with a towel and let them rest for 30 minutes.
High-hydration dough can be sticky. Mine often is and I keep my fingers lightly floured during shaping, which helps a lot. Others prefer to keep their hands wet. Well, it’s a free country.
Shape the Dough
Now, it’s time to shape and mold the sourdough dough into round or elongated rounds. This is the final stage to give the dough strength and structure. I work with one piece of dough at a time and place it seam-side down before rolling it toward myself. I have cleared my board or mat of the flour for this step. I make sure the dough moves toward me and curls under as I pull it forward.
I put the dough balls seam-side up into lightly floured bannetons. A bowl lined with a kitchen towel will do as well. I cover the bannetons with disposable shower caps (plastic wrap) and place both bannetons in the fridge overnight. The dough is good to go the next day when a finger’s poke bounces back slowly and feels light, airy, or plump.
Score the Bread and Bake it Covered
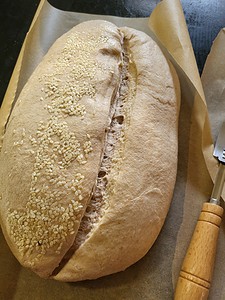
About an hour before I am ready to bake the bread, I preheat my oven to 500°F and pop my two Dutch ovens with lids to heat up. Once everything’s good to go, I turn out the dough from the bannetons onto precut parchment paper, give each dough a long and deep slash across at an angle, then place the dough with the parchment paper underneath into a Dutch oven, put the lid on tight, and bake for 10 minutes before turning the heat down to 475°F for the rest of the bake.
Calibrating the oven’s temperature is helpful. My electric oven is powerful, but old. An oven thermometer I placed once inside showed about 550°F while the dial was set to 500°F. So, I adjusted the dial on the front panel accordingly.
After 10 minutes at these initial high temperatures, my dough will hopefully have puffed up nicely (although I cannot see it). As said, it is time to turn the oven to 475°F for the rest of the bake, or else the loaf’s bottom might catch too much heat and char.
A desired oven spring comes from a lively and mature starter, quality flour, well-developed and cohesive dough, and much less from high baking temperatures. Too high baking temperatures, over 500°F, can cause a loaf’s crust to harden too soon despite steam, keeping the dough from rising freely.
I continue baking for 20 minutes before removing the lids. Only then can I see how if and how much the loaf has risen.
Finish Baking Loaves Uncovered

I remove the lids from the Dutch ovens and keep baking until I get the color and crust I want, which could take around 10 more minutes. I also check if the loaves are done by using a thermometer. The inside of the loaves should reach at least 190°F to be safe for consumption. Mine typically bake to 205°F by the time I remove the loaves from their pots and place them on a wire rack. The loaves must cool for at least an hour to settle down on the inside − before slicing.
For some folks, this waiting is the hardest part of baking homemade sourdough bread.